I have an old box file in which, over the years, I have kept a fair pile of old wargaming documents. They consist of old self-written rules, amendments to old published rulesets, maps of games, the occasional catalogue of long forgotten figure ranges, and (most preciously) a very few old hand-written battle reports.
I haven't delved into the lower depths of this box file for a fair few years, but doing so recently I turned up the map below, nearly at the botom of the pile. It's the map I drew of my first 'proper' wargame, on the new wargame table my dad had made for me. I reckon this would be about 1972. Until then I'd been wargaming on the floor of my bedroom.

I can remember the terrain items clearly: cardboard river and roads, cardboard profile trees, lichen hedges, Bellona walls and bridges, Airfix fences, home made plastic card houses and stepped hills from polystyrene tiles. All on a reinforced hardboard table painted a lovely shiny green!
The table was 8' x 6' and the game was an ACW encounter using the obligatory Airfix figures. I have no record of the forces or the scenario, but the layout still looked pretty good to me even after all these years. Therefore I decided to make this the basis of the scenario for my next SYW bash. I thought I'd show you how the scenario subsequently developed in my head.
Table Size
I can just about squeeze an 8' x 6' table in my dining room, but it means moving furniture and dealing with a lot of other hassle. 6' x 4' is so much easier. The clincher for the smaller table was that I fancied a more crowded battlefield. I wanted all the toys out, and a 6' x 4' table would mean I could have a good dense layout of troops with second lines and reserves, giving a feeling of depth to each side's deployment. At least that was the plan.
Attack-Defence? Encounter?
I guess those are the two basic options for a table top battle. I decided to choose both - have one side attacking in one area of the battlefield (or at one stage of the battle), and the other side attacking in a different area, or at a different stage. This kind of thing is ideal to keep both sides really involved.
Terrain
I don't have the right hills for an identical terrain, so a little re-jigging would be needed. The Turnpike could go, making room for a ridge where North Hill is. South Hill also became a ridge. A reduced road network also made sense to me for the 18th century in central Europe as opposed to the 19th century in the USA. And of course the names on the map would need to change, or just be left out.
Deployment
Like a lot of wargamers, time can be tight for my home games. One way to save time is to have both sides (or most of both sides) already deployed and ready to go. This does mean less generalship can be used in deciding initial deployment and tactics, but it really can save a lot of time in deciding where those figures will go and actually putting them out. Another plus is that your visitor is presented with a table resplendent with toy soldiers all ready to go, which I feel is often a welcoming and tempting sight.
With all this in mind I set up the game as shown below (the map was botched up using Microsoft Office). The Austrians are preparing to attack the Prussians, who they believe they significantly outnumber. The Prussians are expecting a reinforcing grenadier brigade to arrive on their left flank.
 |
| Striped units are cavalry, triangles are artillery. |
Austria
1. Infantry Centre
6 infantry battalions
4 medium artillery batteries
2. Infantry Reserve
2 grenadier battalions
1 infantry battalion
2 cuirassier regiments
4. Right Flank Cavalry (deficient commander)
2 dragoon regiments
2 hussar regiments
5. Light infantry
2 grenz battalions
1 light gun 22 units
Prussia
A. Left Wing (distinguished commander)
4 grenadier battalions
2 medium artillery batteries
B. Right Wing
4 infantry battalions
1 frei-korps battalion
2 medium artillery batteries
1 hussar regiment (independent unit)
C. Cavalry
2 dragoon regiments
1 cuirassier regiment
D. Light infantry
2 jager detachments 19 units
The Game
I was quite pleased with the way the table looked after I'd set it up. With just about all the toys out on a smallish table it had the dense feel I was looking for.
I was quite pleased with the way the table looked after I'd set it up. With just about all the toys out on a smallish table it had the dense feel I was looking for.
 |
| Ready for action. |
 |
| With the armies set up in close proximity, fighting commenced straight away. Here the Prussian cavalry gets stuck in, brushing aside the Austrian light troops then charging 2 artillery batteries in flank.The grenadiers arrive in the background. |
 |
| The Austrians attacked across the valley and the clash was bloody: my rules are designed to move things along quickly. By move 3 this was the result - 4 out of 6 attacking Austrian infantry units done for. You can see 3 of them fleeing back over the ridge to the right of the photo. The Prussians had been pushed back from their positions but had only lost one unit. The Austrian cuirassiers in the foreground were supposed to sweep the opposing Freikorps and Hussars from the field before attacking the Prussian flank - an idea that didn't work out due to poor command rolls. |
 |
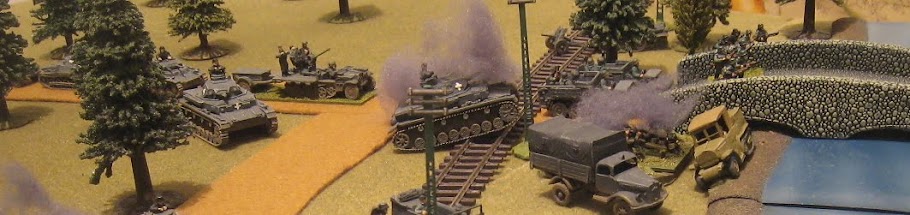
| The main Austrian cavalry force, led by their dithering commander, didn't react quickly enough to stop the Prussian grenadiers getting over the bridges. The grenadiers deployed into line and advanced, leaving the opposing cavalry with little choice but to steadily give way. |
 |
| A rather bare looking Austrian centre. The Austrian cuirassiers have at last been successful, but without infantry support they can do nothing against the Prussian infantry behind the ridge. However, the Prussians themselves can do little more than shelter in the dead ground behind the ridge crest, which is still swept by Austrain artillery fire from 3 batteries. In the background the lines of opposing infantry reform after confused fighting on the Prussian left flank. |
 |
| Final positions after 5 moves. Prussian fire and the unstoppable advance of the Prussian grenadiers have triumphed, with the Austrian reserve seen bested in the background. The Austrians had lost 12 out of 22 units, and so their army was officially broken under my rules. The Prussians had lost 6 out of 19. |
A most enjoyable, all-action game with intense fighting from the start. 5 moves had taken 2.5 hours to play out, which I'm happy with. The Austrians never recovered from their blasting at the start of the game when their centre attacked. The Prussians did have a bit of dice luck here - I'm going to try average dice for firing and melee to see if that reduces the role of chance a bit. Armies in my rules move by alternate brigades from each side, and I'm also thinking about introducing that system for firing rather than the simultaneous fire I use at the moment.
P.S.
On the subject of scenarios, this blog recommends the article on scenario design available on Bob Mackenzie's Web Page.
6 comments:
Magnificent! But most of all I am inspired by the way you made the best use of limited space. Just about forced to content myself with a 6ftx4ft playing surface (which I can at least leave standing for a few days), I have been forced to think about maximising its utility.
Cheers,
Ion
Agreed, a great read. The game certainly did move along at a good pace Keith. Look forward to reading how the average dice work out.
Great looking game and always a pleasure to read how you came up with the scenario etc.
Great pics and it seems an interesting rules system you have there.
If you table was small it really didnt seem to matter in the game as it achieved all you wanted, again very well done.
Great AAR! Very nice pictures and minis, really enjoyable!
Phil.
Superb! Gives me some excellent ideas for my own Prussian/Austrian clashes.
Post a Comment